Chapter 7: Create Your Class Timetable Scheduler in .NET MAUI
This tutorial guides you step-by-step on how to develop a Class Timetable Scheduler app using .NET MAUI in Visual Studio 2022, complete with SQLite database and class reminders.
Step 1: Create a New .NET MAUI Project
- Open Visual Studio 2022 and create a new .NET MAUI App.
- Name the project
TimetableScheduler and click Create.
🎥 Need help creating the project?
Watch the step-by-step video guide (in Pashto) showing how to start a new .NET MAUI project in Visual Studio 2022:
👉
Watch Video Tutorial
Step 1: Install SQLite NuGet Package
Step 1: Use the Right Console
⚠️
Do NOT use regular PowerShell or Terminal.
Instead, open the
NuGet Package Manager Console from within Visual Studio:
- Go to Tools > NuGet Package Manager > Package Manager Console.
Step 2: Run This Command:
Install-Package sqlite-net-pcl
✅ This will download and install the correct sqlite-net-pcl package from nuget.org into your MAUI project.
Step 2: Define the TimetableEntry Model
Now let’s define a model class named TimetableEntry inside a new folder called Models. Use the following code inside TimetableEntry.cs file:
namespace TimetableScheduler.Models
{
public class TimetableEntry
{
[PrimaryKey, AutoIncrement]
public int Id { get; set; }
public string Day { get; set; }
public string Subject { get; set; }
public string Time { get; set; }
public string Teacher { get; set; }
}
}
📘 Explanation of TimetableEntry Model
namespace TimetableScheduler.Models
This line defines the namespace under which the class resides. It helps group related classes logically and avoids conflicts in naming across your app.
public class TimetableEntry
Declares the class which will represent each timetable entry record.
[PrimaryKey, AutoIncrement]
These are SQLite attributes from the sqlite-net-pcl package. They make the Id the unique identifier and auto-increment it for each new entry.
public int Id { get; set; }
The unique ID for each timetable record — automatically assigned by SQLite.
public string Day { get; set; }
Stores which day the class is on, like "Monday" or "Friday".
public string Subject { get; set; }
The subject title, such as "English", "Biology", etc.
public string Time { get; set; }
The time slot during which the class takes place.
public string Teacher { get; set; }
The name of the teacher assigned to this timetable slot.
💡 Final Tip: Make sure you also include using SQLite; at the top of your file to enable the [PrimaryKey] and [AutoIncrement] attributes.
Step 3: Create the DatabaseService Class
Next, create a folder named Services and add a new class file called DatabaseService.cs. This class will handle all SQLite operations like saving, retrieving, and deleting timetable entries.
using SQLite;
using TimetableScheduler.Models;

namespace TimetableScheduler.Services
{
    public class DatabaseService
    {
        readonly SQLiteAsyncConnection _database;

        public DatabaseService(string dbPath)
        {
            _database = new SQLiteAsyncConnection(dbPath);
            _database.CreateTableAsync<TimetableEntry>().Wait();
        }

        public Task<List<TimetableEntry>> GetEntriesAsync() =>
            _database.Table<TimetableEntry>().ToListAsync();

        public Task<int> SaveEntryAsync(TimetableEntry entry) =>
            _database.InsertAsync(entry);

        // ✅ Add this method to fix the delete error in MainPage.xaml.cs
        public Task<int> DeleteTimetableEntryAsync(TimetableEntry entry) =>
            _database.DeleteAsync(entry);

        public Task<int> DeleteEntryAsync(TimetableEntry entry) =>
            _database.DeleteAsync(entry);
    }
}
🔍 Line-by-Line Explanation of DatabaseService.cs
using SQLite;
Brings in SQLite support for database operations like async connection, insert, delete, etc.
using TimetableScheduler.Models;
Gives access to the TimetableEntry model defined earlier.
namespace TimetableScheduler.Services
This groups the class logically under the Services folder and helps with maintainability.
public class DatabaseService
Defines a service class to encapsulate all SQLite database operations.
readonly SQLiteAsyncConnection _database;
Declares a private database connection field used throughout the class.
public DatabaseService(string dbPath)
Constructor that accepts a database path and initializes the SQLite connection.
_database = new SQLiteAsyncConnection(dbPath);
Initializes the asynchronous connection to the SQLite database.
_database.CreateTableAsync<TimetableEntry>().Wait();
Creates the table for TimetableEntry if it doesn’t already exist. Wait() forces the task to complete before proceeding.
GetEntriesAsync()
Retrieves all timetable entries asynchronously as a list.
SaveEntryAsync(TimetableEntry entry)
Inserts a new entry into the TimetableEntry table.
DeleteTimetableEntryAsync(TimetableEntry entry)
Deletes a timetable entry — this is useful to avoid errors in MainPage.xaml.cs.
DeleteEntryAsync(TimetableEntry entry)
Also deletes a timetable entry — serves the same purpose, but can be renamed/repurposed as needed.
💡 Tip: In production apps, you should handle exceptions using try-catch blocks for better error reporting.
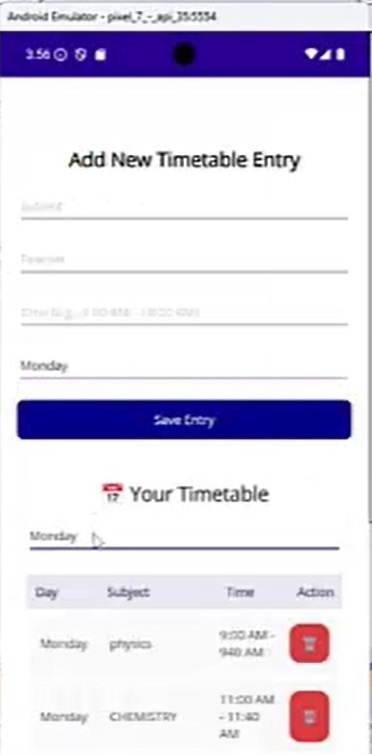
Step 4: Design the User Interface in MainPage.xaml
Now build the visual layout of your timetable app. Replace everything in your MainPage.xaml with the following code:
<ScrollView>
<VerticalStackLayout Padding="20" Spacing="15">
<Label Text="Add New Timetable Entry"
FontSize="22"
HorizontalOptions="Center"
FontAttributes="Bold" />
<Entry x:Name="subjectEntry" Placeholder="Subject" />
<Entry x:Name="teacherEntry" Placeholder="Teacher" />
<Entry x:Name="timeEntry" Placeholder="Time (e.g., 9:00 AM - 10:00 AM)" />
<Picker x:Name="dayPicker" Title="Select Day">
<Picker.ItemsSource>
<x:Array Type="{x:Type x:String}">
<x:String>Monday</x:String>
<x:String>Tuesday</x:String>
<x:String>Wednesday</x:String>
<x:String>Thursday</x:String>
<x:String>Friday</x:String>
<x:String>Saturday</x:String>
</x:Array>
</Picker.ItemsSource>
</Picker>
<Button Text="Save Entry" Clicked="OnSaveClicked"
BackgroundColor="DarkBlue" TextColor="White" />
<StackLayout Padding="10">
<Label Text="📅 Your Timetable"
FontSize="22"
FontAttributes="Bold"
TextColor="#2C3E50"
HorizontalOptions="Center"
Margin="0,20,0,10" />
<!-- Day Filter Picker -->
<Picker x:Name="DayPicker"
Title="Select Day"
SelectedIndexChanged="OnDaySelected"
HorizontalOptions="Fill"
Margin="0,0,0,20">
<Picker.ItemsSource>
<x:Array Type="{x:Type x:String}">
<x:String>Monday</x:String>
<x:String>Tuesday</x:String>
<x:String>Wednesday</x:String>
<x:String>Thursday</x:String>
<x:String>Friday</x:String>
<x:String>Saturday</x:String>
<x:String>Sunday</x:String>
</x:Array>
</Picker.ItemsSource>
</Picker>
<!-- Timetable List -->
<CollectionView x:Name="TimetableList"
ItemsSource="{Binding TimetableEntries}">
<CollectionView.Header>
<Grid Padding="10" BackgroundColor="#E8EAF6">
<Grid.ColumnDefinitions>
<ColumnDefinition Width="1.5*" />
<ColumnDefinition Width="2.5*" />
<ColumnDefinition Width="1.5*" />
<ColumnDefinition Width="Auto" />
</Grid.ColumnDefinitions>
<Label Text="Day" FontAttributes="Bold" TextColor="#34495E" />
<Label Text="Subject" FontAttributes="Bold" Grid.Column="1" TextColor="#34495E" />
<Label Text="Time" FontAttributes="Bold" Grid.Column="2" TextColor="#34495E" />
<Label Text="Action" FontAttributes="Bold" Grid.Column="3" TextColor="#34495E" />
</Grid>
</CollectionView.Header>
<CollectionView.ItemTemplate>
<DataTemplate>
<Grid Padding="10" BackgroundColor="#F9F9F9"
ColumnSpacing="10"
Margin="5"
VerticalOptions="Center">
<Grid.ColumnDefinitions>
<ColumnDefinition Width="1.5*" />
<ColumnDefinition Width="2.5*" />
<ColumnDefinition Width="1.5*" />
<ColumnDefinition Width="Auto" />
</Grid.ColumnDefinitions>
<Label Text="{Binding Day}" VerticalTextAlignment="Center" TextColor="#2C3E50" />
<Label Text="{Binding Subject}" Grid.Column="1" VerticalTextAlignment="Center" TextColor="#2C3E50" />
<Label Text="{Binding Time}" Grid.Column="2" VerticalTextAlignment="Center" TextColor="#2C3E50" />
<Button Text="🗑"
BackgroundColor="#E74C3C"
TextColor="White"
Padding="8,2"
CornerRadius="12"
FontSize="14"
Clicked="OnDeleteClicked"
CommandParameter="{Binding .}"
Grid.Column="3" />
</Grid>
</DataTemplate>
</CollectionView.ItemTemplate>
</CollectionView>
</StackLayout>
</VerticalStackLayout>
</ScrollView>
🧩 XAML Layout Explanation
<ContentPage>
Defines the main page UI layout.
<ScrollView>
Ensures the content scrolls vertically if needed.
<VerticalStackLayout>
Arranges all form fields and labels vertically with spacing and padding.
<Entry>
Textboxes for users to input Subject, Teacher, and Time.
<Picker x:Name="dayPicker">
Dropdown to let users select a day of the week.
<Button Text="Save Entry" Clicked="OnSaveClicked" />
A button that saves the input by calling the OnSaveClicked function in the code-behind.
<Label Text="📅 Your Timetable" />
Section header for the timetable viewer.
<Picker x:Name="DayPicker" SelectedIndexChanged="OnDaySelected" />
Dropdown to filter timetable entries by day. When a day is selected, OnDaySelected is triggered.
<CollectionView>
Displays a list of timetable entries with columns for Day, Subject, Time, and Delete Action.
<Button Text="🗑" CommandParameter="{Binding .}" Clicked="OnDeleteClicked" />
A delete button inside each row that removes a timetable entry by passing the current object to the delete handler.
💡 Note:
All UI controls are bound to logic defined in MainPage.xaml.cs, which we’ll build next to handle saving, loading, and deleting entries.
Step 5: Add Backend Logic in MainPage.xaml.cs
Below is the complete C# backend code for your timetable scheduler in MainPage.xaml.cs. This handles data loading, filtering, saving, and deletion using the DatabaseService and data binding in .NET MAUI:
using System.Collections.ObjectModel;
using System.Linq;
using TimetableScheduler.Models;
using TimetableScheduler.Services;

namespace TimetableScheduler
{
    public partial class MainPage : ContentPage
    {
        private readonly DatabaseService _dbService;

        public ObservableCollection<TimetableEntry> TimetableEntries { get; set; } = new();
        private List<TimetableEntry> AllEntries { get; set; } = new();

        public MainPage(DatabaseService dbService)
        {
            InitializeComponent();
            _dbService = dbService;
            BindingContext = this;

            LoadData();
        }

        private async void LoadData()
        {
            AllEntries = await _dbService.GetEntriesAsync();

            TimetableEntries.Clear();
            foreach (var entry in AllEntries)
                TimetableEntries.Add(entry);
        }

        private async void OnSaveClicked(object sender, EventArgs e)
        {
            if (string.IsNullOrWhiteSpace(subjectEntry.Text) ||
                string.IsNullOrWhiteSpace(teacherEntry.Text) ||
                string.IsNullOrWhiteSpace(timeEntry.Text) ||
                dayPicker.SelectedItem == null)
            {
                await DisplayAlert("Missing Info", "Please fill all fields.", "OK");
                return;
            }

            var entry = new TimetableEntry
            {
                Day = dayPicker.SelectedItem.ToString(),
                Subject = subjectEntry.Text.Trim(),
                Teacher = teacherEntry.Text.Trim(),
                Time = timeEntry.Text.Trim()
            };

            await _dbService.SaveEntryAsync(entry);

            subjectEntry.Text = string.Empty;
            teacherEntry.Text = string.Empty;
            timeEntry.Text = string.Empty;

            await LoadAndFilter(DayPicker.SelectedItem?.ToString());
            await DisplayAlert("Saved", "Timetable has been saved. Please select a day to view entries.", "OK");
        }

        private async void OnDeleteClicked(object sender, EventArgs e)
        {
            var button = sender as Button;
            var entry = button?.CommandParameter as TimetableEntry;

            if (entry != null)
            {
                await _dbService.DeleteTimetableEntryAsync(entry);
                AllEntries.Remove(entry);
                TimetableEntries.Remove(entry);
            }
        }

        private void OnDaySelected(object sender, EventArgs e)
        {
            if (DayPicker.SelectedItem is string selectedDay)
            {
                FilterByDay(selectedDay);
            }
        }

        private async Task LoadAndFilter(string selectedDay)
        {
            AllEntries = await _dbService.GetEntriesAsync();
            FilterByDay(selectedDay);
        }

        private void FilterByDay(string day)
        {
            var filtered = AllEntries
                .Where(e => e.Day.Equals(day, StringComparison.OrdinalIgnoreCase))
                .ToList();

            TimetableEntries.Clear();
            foreach (var item in filtered)
                TimetableEntries.Add(item);
        }
    }
}
Step 6: Setup App Startup Logic in App.xaml.cs
This file configures your app’s database path and initializes the database when the app starts. Replace the contents of your App.xaml.cs with the following code:
using System;
using System.IO;
using Microsoft.Maui.Storage; // Needed for FileSystem.AppDataDirectory
using TimetableScheduler.Services; // ✅ This fixes the 'DatabaseService' not found
using TimetableScheduler;

namespace TimetableScheduler
{
    public partial class App : Application
    {
        public static string DatabasePath { get; private set; }

        public App()
        {
            InitializeComponent();

            // ✅ Set database path in a writable location
            DatabasePath = Path.Combine(
                FileSystem.AppDataDirectory, "timetable.db");

            // ✅ Initialize DatabaseService with path
            var databaseService = new DatabaseService(DatabasePath);

            // ✅ Pass the DatabaseService to MainPage
            MainPage = new NavigationPage(new MainPage(databaseService));
        }
    }
}
🧠 App.xaml.cs Code Explanation
using System;
Brings in the System namespace which contains base classes like Application, String, Exception, etc.
using System.IO;
Enables file and directory handling, needed here to combine folder path and database file name using Path.Combine().
using Microsoft.Maui.Storage;
Imports MAUI's storage utilities. It provides access to the device's app data folder using FileSystem.AppDataDirectory.
using TimetableScheduler.Services;
Allows us to use the DatabaseService class from the Services folder to handle database operations.
using TimetableScheduler;
Imports the main namespace of the project where the App and MainPage classes are defined.
public partial class App : Application
Defines the App class, which inherits from Application and represents the entry point of the MAUI app.
public static string DatabasePath { get; private set; }
Declares a static property to store the full path to the SQLite database. It’s accessible from anywhere in the app but can only be set from within this class.
public App()
Constructor method for the App class. This runs when the app starts.
InitializeComponent();
Initializes the components declared in XAML such as resources, styles, and layouts. Required by MAUI.
DatabasePath = Path.Combine(FileSystem.AppDataDirectory, "timetable.db");
Generates the full path to the database file by combining the app's local storage directory with the filename timetable.db.
var databaseService = new DatabaseService(DatabasePath);
Instantiates a new DatabaseService and passes the DatabasePath to it so it can connect to the database.
MainPage = new NavigationPage(new MainPage(databaseService));
Sets the main screen of the app. Here, we wrap the MainPage inside a NavigationPage to allow page navigation. The DatabaseService instance is passed into MainPage as a dependency.
🛠 MauiProgram.cs – Register Services and App Configuration
using Microsoft.Extensions.Logging;
using TimetableScheduler.Services; // <-- Required for DatabaseService
using System.IO;

namespace TimetableScheduler
{
    public static class MauiProgram
    {
        public static MauiApp CreateMauiApp()
        {
            var builder = MauiApp.CreateBuilder();

            builder
                .UseMauiApp<App>()
                .ConfigureFonts(fonts =>
                {
                    fonts.AddFont("OpenSans-Regular.ttf", "OpenSansRegular");
                    fonts.AddFont("OpenSans-Semibold.ttf", "OpenSansSemibold");
                });

#if DEBUG
            builder.Logging.AddDebug();
#endif

            // ✅ Register DatabaseService as a singleton
            string dbPath = Path.Combine(FileSystem.AppDataDirectory, "timetable.db3");
            builder.Services.AddSingleton(new DatabaseService(dbPath));

            // ✅ Register MainPage so it can be injected into App.xaml.cs
            builder.Services.AddSingleton<MainPage>();

            return builder.Build();
        }
    }
}
📘 Line-by-Line Explanation of MauiProgram.cs
using Microsoft.Extensions.Logging;
Enables built-in logging in the application, useful for debugging or tracking app behavior.
using TimetableScheduler.Services;
Imports your own namespace that contains the DatabaseService class, making it accessible here.
using System.IO;
Provides access to file and path handling utilities, like Path.Combine.
public static class MauiProgram
This is the entry point class that configures and builds your MAUI application.
public static MauiApp CreateMauiApp()
A method that initializes the application and returns a configured MauiApp instance.
var builder = MauiApp.CreateBuilder();
Creates a builder instance used to configure services, fonts, pages, and other dependencies.
builder.UseMauiApp<App>();
Specifies the root class (App.xaml) of your MAUI application.
ConfigureFonts(...)
Adds custom fonts like OpenSans, which can be referenced by alias in XAML or C#.
#if DEBUG ... #endif
Enables debug logging during development only (not included in release builds).
Path.Combine(...)
Builds the full file path for your SQLite database using the AppDataDirectory on each platform.
builder.Services.AddSingleton(...)
Registers DatabaseService as a singleton service – one instance is reused throughout the app.
builder.Services.AddSingleton<MainPage>();
Registers MainPage so it can be injected wherever needed (like in App.xaml.cs).
return builder.Build();
Final step: compiles and returns the fully configured MAUI app instance.
✅ Conclusion
In this tutorial, we developed a complete Timetable Scheduler App using .NET MAUI and SQLite with full CRUD operations. From defining the TimetableEntry model to building the DatabaseService, designing the UI in XAML, and configuring MauiProgram.cs, we followed best practices for performance, maintainability, and scalability.
Whether you're creating a student timetable app or a meeting planner, this foundation is robust and flexible enough to adapt to various scheduling needs.
❓ Frequently Asked Questions (FAQs)
Q1: Can I use this timetable scheduler with a cloud-based database instead of SQLite?
Yes, while this tutorial uses SQLite for offline use, you can extend it to use Azure SQL, Firebase, or any REST API backend by modifying the DatabaseService.
Q2: What platforms does .NET MAUI support?
.NET MAUI supports Android, iOS, Windows, and macOS. This means your timetable app can run on multiple platforms from a single codebase.
Q3: How can I back up or export the timetable data?
You can implement an export feature that writes to .csv or .json files or syncs the data to a cloud service via REST APIs.
Q4: What’s the benefit of registering DatabaseService as a singleton?
Registering it as a singleton ensures that only one instance of the database connection is used throughout the app’s lifecycle, improving performance and stability.
Q5: How do I make the timetable dynamic based on user input or selected dates?
Extend the model to include DateTime fields and use data-binding with DatePicker and CollectionView in XAML for a more interactive experience.
🔎 Final Thoughts
If you're building a student timetable app in .NET MAUI, or exploring how to implement offline SQLite storage in your cross-platform apps, this guide is a great starting point.
Don’t forget to explore other features like reminders, notifications, cloud sync, and user authentication to take your app to the next level!
🔔 For more tutorials on .NET MAUI app development, SQLite database integration, and cross-platform mobile projects, keep visiting our blog or subscribe to our YouTube channel.