GPA Calculator App using .NET MAUI – Step-by-Step Guide for Students
In this chapter, you'll learn how to create a beautiful, functional GPA Calculator App using .NET MAUI. This app will help students calculate their average percentage and GPA based on their subject marks. You’ll design the UI using XAML and write the calculation logic in C# code-behind.
🌟 Key Features of This App
- Clean and responsive UI with input fields for subject marks
- Real-time GPA calculation logic using standard conversion
- Cross-platform – works on Android, iOS, and Windows
- Perfect mini-project for students and beginners
🎯 Prerequisites
- Visual Studio 2022 or later
- .NET 7 or .NET 8 installed with MAUI workload
- Basic understanding of XAML and C#
📂 Step 1: Create a New .NET MAUI Project
Open Visual Studio and create a new project:
- Project Type: .NET MAUI App
- Project Name: GpaCalculatorApp
- Location: Choose your preferred directory
🖌️ Step 2: Design UI in MainPage.xaml
Replace the XAML code inside MainPage.xaml with the following:
<ContentPage xmlns="http://schemas.microsoft.com/dotnet/2021/maui"
             x:Class="GpaCalculatorApp.MainPage"
             Title="GPA Calculator">
    <ScrollView>
        <VerticalStackLayout Padding="20" Spacing="15">

            <Label Text="Enter your marks for 5 subjects:"
                   FontSize="20" FontAttributes="Bold" />

            <Entry x:Name="mark1Entry" Placeholder="Subject 1 Marks (out of 100)" Keyboard="Numeric"/>
            <Entry x:Name="mark2Entry" Placeholder="Subject 2 Marks (out of 100)" Keyboard="Numeric"/>
            <Entry x:Name="mark3Entry" Placeholder="Subject 3 Marks (out of 100)" Keyboard="Numeric"/>
            <Entry x:Name="mark4Entry" Placeholder="Subject 4 Marks (out of 100)" Keyboard="Numeric"/>
            <Entry x:Name="mark5Entry" Placeholder="Subject 5 Marks (out of 100)" Keyboard="Numeric"/>

            <Button Text="Calculate GPA" Clicked="OnCalculateGpaClicked" />

            <Label x:Name="resultLabel"
                   Text="Your GPA will appear here"
                   FontSize="18"
                   TextColor="DarkGreen"
                   HorizontalOptions="Center" />

        </VerticalStackLayout>
    </ScrollView>
</ContentPage>
🔍 XAML Code Explanation
<ContentPage>: This is the main container of the screen.ScrollView: Allows the UI to scroll on smaller screens.VerticalStackLayout: Places elements vertically, one below another.Label: Displays a heading for the app.Entry: Input fields where users enter marks.Button: A button that triggers the GPA calculation.resultLabel: Displays the final GPA and percentage result.
⚙️ Step 3: Add Logic in MainPage.xaml.cs
Now open MainPage.xaml.cs and add the following code:
namespace GpaCalculatorApp;

public partial class MainPage : ContentPage
{
    public MainPage()
    {
        InitializeComponent();
    }

    private void OnCalculateGpaClicked(object sender, EventArgs e)
    {
        try
        {
            double[] marks = new double[5];
            marks[0] = double.Parse(mark1Entry.Text);
            marks[1] = double.Parse(mark2Entry.Text);
            marks[2] = double.Parse(mark3Entry.Text);
            marks[3] = double.Parse(mark4Entry.Text);
            marks[4] = double.Parse(mark5Entry.Text);

            double total = marks.Sum();
            double percentage = total / 5;

            double gpa = ConvertToGPA(percentage);

            resultLabel.Text = $"Percentage: {percentage:F2}%\\nEstimated GPA: {gpa:F2}";
        }
        catch
        {
            resultLabel.Text = "Please enter valid numeric marks!";
        }
    }

    private double ConvertToGPA(double percentage)
    {
        if (percentage >= 85) return 4.0;
        else if (percentage >= 80) return 3.7;
        else if (percentage >= 75) return 3.3;
        else if (percentage >= 70) return 3.0;
        else if (percentage >= 65) return 2.7;
        else if (percentage >= 60) return 2.3;
        else if (percentage >= 50) return 2.0;
        else return 0.0;
    }
}
🧠 C# Code Explanation
- MainPage(): Constructor that initializes the UI.
- OnCalculateGpaClicked: Event handler that runs when the button is clicked.
- double.Parse(...): Converts user input from text to number.
- marks.Sum(): Adds all marks to get the total.
- percentage = total / 5: Calculates average percentage.
- ConvertToGPA(): Converts percentage into GPA using a standard 4.0 scale.
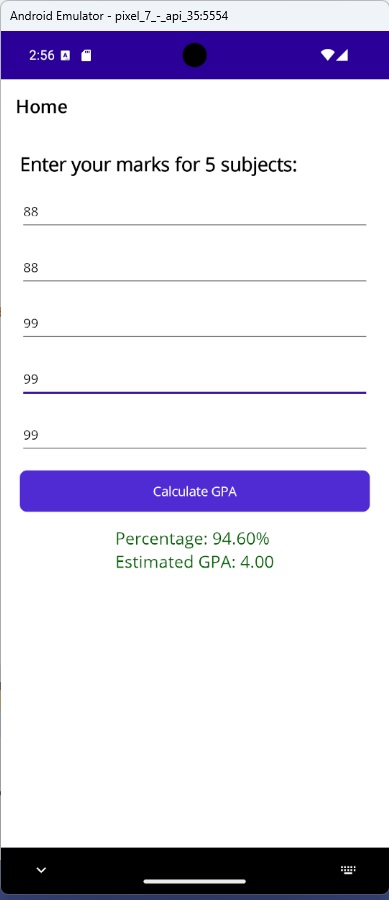
📱 Step 4: Run and Test the App
- Run on Android Emulator or Windows Machine.
- Enter 5 subject marks and press "Calculate GPA".
- See the GPA and percentage displayed instantly.
🎓 Educational Value
This mini-project improves student understanding of real-life app development. It uses practical input handling, business logic, and cross-platform UI design. You can extend it later by adding letter grades, storing history, or exporting results.